@DeletedUser41376418 (talk | contribs) (added more common rules for beginners. Some overlaps, but some people may skip past the basic controls section.) |
@DeletedUser41376418 (talk | contribs) m (→General rules for beginners: added detail) |
||
| Line 132: | Line 132: | ||
One of the first things you will learn is [[farming]] [[Domestic Gooseberry Bush|gooseberries]], which is vital to the survival of a town. This task is usually assigned to children so that they can work while staying close to food. Here's the basics: Bushes that need attention will be a brown colour. Mouse-over a bush to read its state. Languishing bushes need a [[Bowl of Soil|bowl of soil]], and dry bushes need a [[Bowl of Water|bowl of water]]. Bigger clumps of dirt can be picked up with a [[basket]], and you may need to get water out of a [[Deep Well]] or [[Cistern]] with a [[bucket]]. If you are having trouble, watch or ask other players. |
One of the first things you will learn is [[farming]] [[Domestic Gooseberry Bush|gooseberries]], which is vital to the survival of a town. This task is usually assigned to children so that they can work while staying close to food. Here's the basics: Bushes that need attention will be a brown colour. Mouse-over a bush to read its state. Languishing bushes need a [[Bowl of Soil|bowl of soil]], and dry bushes need a [[Bowl of Water|bowl of water]]. Bigger clumps of dirt can be picked up with a [[basket]], and you may need to get water out of a [[Deep Well]] or [[Cistern]] with a [[bucket]]. If you are having trouble, watch or ask other players. |
||
| − | '''5. [[Tools]] break - Don't overuse them.'''<br/> |
+ | '''5. [[Tools]] break - Don't overuse them. Till piles of two soil to save [[iron]].'''<br/> |
Certain [[tools]] have a limited number of uses until they break. Using steel tools efficiently is especially important since the [[Iron Ore|iron]] nerf. [[Shovel]]s are vital for the [[Compost]] cycle and generally should not be used for digging [[grave]]s (see [[Bones#Player Bones|Bones]] page for full explanation). A [[Hoe]] can be used more efficiently by only tilling piles of two dirt (see [[Hoe]] page for full explanation). |
Certain [[tools]] have a limited number of uses until they break. Using steel tools efficiently is especially important since the [[Iron Ore|iron]] nerf. [[Shovel]]s are vital for the [[Compost]] cycle and generally should not be used for digging [[grave]]s (see [[Bones#Player Bones|Bones]] page for full explanation). A [[Hoe]] can be used more efficiently by only tilling piles of two dirt (see [[Hoe]] page for full explanation). |
||
Revision as of 12:38, 17 January 2019
This is a community-written Starting Guide for One Hour One Life. A more detailed guide on how to survive and thrive in an early settlements is available on the Eve page.
Introduction
You've finished downloading your copy of One Hour One Life. Excitedly, you load into a colourful world filled with promise as either a newborn baby or a young woman. You're completely naked, freezing, already hungry and have no idea what you're doing. You die. You reload and die again. You try asking for help but the answers, if there are any, are vague and non-specific. You're frustrated.
The purpose of this page is to smooth the learning curve of the early game. As such, it will, by necessity, contain spoilers and should be avoided by players wishing to learn by trial-and-error or within the social environments of the game world.
If nothing else, all players should enter the world with the knowledge that the environment can be permanently altered by their actions. Certain resources are integral to the survival and advancement of player societies and it is imperative that guidelines are followed lest areas become stripped of their resources and rendered unsuitable for continued settlement.
Tutorial and Recipes
The tutorial is a basic introduction to the game, accessed on the login screen of the game (currently visible only at first login, and after death). It will instruct you on the basic mechanics of the game, and give you time to experiment in a closed environment. In order to finish the tutorial, you must light the "tutorial torch" near the end of the passageway. This requires knowledge of fire.
Much vital information is omitted from the tutorial, some of which can be accessed by using the inbuilt recipe index. Holding an item in game, will make a set of related recipes appear in the bottom right corner of the game interface. These can be scrolled through using tab, and z+tab to go back. Ctrl+tab makes bigger page jumps. Furthermore, if you type "/" into the speech box, followed by an item name, e.g. "/Rope", it will only show recipes used to craft that item. Entering "/" will clear the search function again. The search function is limited, and can be difficult to use when lots is happening on screen, but can still come in handy.
The information that cannot be gleaned from the tutorial or the recipe index, can be discovered through gameplay, observing or asking other players, or (as a last resort) can be found in this wiki and at Onetech. Additionally, you can try asking for help on the forums. The wiki, tech-tree and forums can all be accessed via links at the top of the game's official website
Basic Concepts
Controls
One Hour One Life primarily uses the mouse buttons to control your character. Most actions are performed using a left-click, such as moving your character, picking up or interacting with objects, crafting, and eating. Right-click is used to drop items, remove objects from certain containers (like baskets), stacks (like plates), and to use weapons. Attempting to drop an item on an occupied space will swap the item in your hand for the one in that space. You can mouse-over an item or player to see its name at the bottom of your screen.
As a baby, you have limited interactions with the world and are entirely dependent on your mother until the age of 4 (when you reach 7-8 hunger boxes) and enter childhood. You will be able to do most things in childhood, except for some cases such as Hand Carts, Big Hard Rock, and knife which can only be picked up once you reach a certain age.
Pressing Enter will open a speech box into which messages can be typed. Pressing enter again will display the message above your character's head, or close an empty speech box. The length of messages you can type increases with your character's age, starting with only 1 symbol as a baby, up to around 60 symbols at the end of your character's life. The up and down arrows will cycle through previously spoken phrases. The speech box can also be used to type various commands such as the recipe index.
The space bar can be used to 'freeze' the camera, giving you finer control when you need to click something while moving. Release space to unfreeze the camera, which will move automatically while you navigate.
Eating
To eat, pick up a food object using left click (this could be anything from a simple wild berry to a cooked pie), then click on your character. Beware if you are wearing an apron or backpack as clicking on these clothing will store the held item. Clicking the food directly onto your character's face should avoid this problem.
Crafting
Most crafting steps involve combining 2 items. To do this, pick up one item using left-click, then left-click on the item to be combined with. In some recipes, it matters which way around the item is added.
Hunger Gauge
On the bottom left of your screen you will see a line of small boxes representing your hunger. As you go without food the gauge empties from the right to left and boxes turn from black to white and if you run out of filled squares you will starve to death, though a warning chime will sound to alert you when your hunger reaches critical levels (this chime ceases to activate for very old characters who must pay particular attention to their hunger if they wish to survive to 60 years old). Babies begin their lives with 4 hunger boxes which gradually increases to a max of 20 for adults. As old age sets in, characters begin steadily losing hunger boxes until once again, only 4 remain, until they die from old age.
Yum Bonus
Once you eat a food item, your "Yum bonus" chain will begin. For every unique food you eat, you will get a +1 food bonus added which acts as extra food pips on top of your hunger bar. So if you eat three unique foods in a row, you will have a food bonus of +3 hunger pips. The food bonus reverts to 0 when you eat a non-unique food in your train. When you pick up a food, it will tell you if the food will add to your bonus (YUM) or a food you've already eaten (MEH).
Warmth
On the bottom right of the screen is a warmth indicator with an arrow indicating your current level of warmth and a midpoint representing an optimal temperature. Being too hot or too cold is not in itself dangerous, but warmth is directly tied to how quickly the hunger gauge drains. Aim to be as close to the midpoint as possible -- values above or below this point increase hunger drain, with characters at extreme temperatures requiring up to 4 times the amount of food to stave off starvation. Many factors contribute to heat, including clothing, fire, biome, buildings, and disease. If you are placed near a fire or on a desert tile as a baby, take note of your heat meter and do not move from an optimal spot. Pick up and wear any discarded clothing you find, but take care not to overheat if fully-clothed and standing near heat sources.
Inventory

There is no traditional inventory system in OHOL. Each character is able to carry just one item in their hands at a time including containers, the most basic of which is the basket. Later on, backpacks and carts provide additional carrying capacity. If you are holding something and wish to pick up a baby or harvest a berry, you must first empty your hands by right-clicking on an empty space on the ground. If you instead right-click on an occupied space you will swap the item in your hand for the one in that space. You can swap an item in your hand for one in a container if there is an empty space in the container. It is important to be mindful of these limitations should you find yourself in a location where few open ground spaces exist as it is possible to starve or neglect your children simply because you cannot find a place to drop the item you're holding.
Bloodlines
It is possible, and recommended, to choose a family name as an Eve. This can be accomplished by using one of a variety of phrases, such as "I am X", where X is the desired family name. You will then be styled as "Eve X". In addition, it is possible to give first names to your children by using phrases such as "You are NAME" while holding them. Your children will then be styled as "NAME X". You can name children and adults as well if they do not have a name. Just stand near them and say "You are NAME" but they will not receive your family name, only a first name. Should you have a daughter but fail to name her she will no longer be able to pass your family name onto her own children (though she will still be considered to be related to you along with her children, if any). Names are selected according to external lists (first and last) and should you select a name that is not on the list the game will automatically select a similar one.
A link to view Family Trees can be accessed on the game's main menu and at the top of the official OHOL website.
See also: Names • Lineage Ban
Curses
If you see someone griefing, you can curse them by using phrases such as "Curse X" and their curse score will go up by 1 point. You will use up your curse token (see image) which takes 2 hours of your playtime to regenerate, so make sure to use it on someone that deserves it. Many players mistake harmless acts for griefing, due to misinformation or an incomplete understanding. Even murder is not always necessarily griefing. Misunderstanding can be alleviated by asking simple questions of the perpetrator (For example, "WHY?"). Use your judgement and remember- one day the misplaced blame may be cast upon you!
DONKEY TOWN
When a player reaches a curse score of 8 they will be born marked and their speech bubbles will be inverted (white text with black background) in their next life. Marked players will also be force-spawned into "Donkey Town", a far-away spawn location on all servers, where you can only spawn in if you are marked. Marked players will then have to play out a fixed amount of time, after which their score will be set to 7, and can be born back at the normal spawn locations. After that, you burn one curse point every hour that you play as usual. Donkey Town residents will be able to see a count of their excess curse score.
For more information on how Curses work, see the Curse page.
Biomes
Biomes are zones where only certain resources spawn. A basic understanding is useful in locating early-game food and materials to craft tools, as well to avoid dangerous animals. Note that this list is incomplete, focusing only on the resources you will be using early on, and that some of these items may be found in more than one biome. For more complete list, see the Biomes page.
- Grasslands have berries, milkweed, the early trees you'll need, and soil.
- Yellow prairies have rabbits, wheat, and wild carrots.
- Swamps have tule reeds, goose ponds, and clay.
- Badlands have rocks and flint.
- Tundra biomes have seals and rocks. These areas are cold and will lower a player's temperature. It may be better to avoid tundra in early game if you can.
- Deserts have cacti, flint and rocks. These areas are hot and will raise a player's temperature.
- Jungles have bananas but also mosquitos. These areas are warm and will raise a player's temperature.


Other Dangers
More often than not, you will die of starvation, however there are other ways to die in OHOL. Certain animals, including some domesticated animals, are dangerous. Encountering a hostile animal (by occupying the same space as a resting hostile animal, or while running), will result in the player being wounded, and eventual death if not treated.
Wolves, snakes, and boars move erratically, usually away from the player, and are confined to their biome, but still present a danger (especially when hidden in thick forests). Unlike other wildlife, Bears actively pursue players in their vicinity, and will follow a player across biomes, presenting a risk to an entire village. Mosquitos will not immediately kill a player (unless bit several times), but the Yellow Fever they give will affect your temperature and food gauge, making it more likely that you will die of starvation.
Other players, too, can be dangerous when they are armed (sometimes entirely by accident).
Life as a Baby
Most of the time, you will spawn as a baby. You have few hunger pips and are completely helpless, totally reliant on your mother or other adult women. You should expect to die frequently, and be abandoned or otherwise neglected fairly often. This is normal and should not be taken personally. Settlements must carefully manage their populations or risk starvation and, in the case of Eve mothers, the burden of caring for babies is great.
To raise your chances of survival, stay close to your mother (unless she instructs otherwise), stay a balanced temperature if you can, and tell her when you reach approximately 2 hunger pips (Most commonly communicated by typing 'F' for 'food'). Follow her, or remain still when appropriate so she can easily pick up you when required. Picking you up requires the mother to sacrifice 1 pip of her hunger bar, so avoid jumping out of her arms (by clicking or trying to move) while she carries you. In the first minute of life, you will be unable to jump from your mother's arms.
If your mother neglects you, you might be lucky enough to have an older sibling or another family member who is willing to feed you. Show your appreciation by following their directions. Note that only young women can breastfeed you. Old women or males cannot breastfeed. However, any player who can pick up objects can feed babies by clicking on them while holding a piece of food.
Above all, do not get discouraged by death -- just keep respawning until you are born to a mother who can care for you. Or spawn as an Eve.
Life as an Eve
Sometimes you will spawn as a 14-year-old woman, known as an Eve. You will be naked, most-likely in the middle of no-where, and soon other players will begin spawning as your babies (assuming you are not playing entirely by yourself). To feed your baby you must pick it up at a cost to your own hunger gauge. Holding a baby will keep its hunger gauge maxed out at no additional penalty to yourself, but you are unable to pick up or interact with anything else. There is an internal cooldown that attempts to space out births, but, since it is semi-random, you may have many children in quick succession or no children for minutes at a time.
Your goal is to find a food source before you starve, then ultimately to find a good base location to build a future for yourself and any children you have. Most early-game food sources can be found in the grasslands. Your best bet is to search for berry bushes. These can be supplemented with various other non-renewable wild food until you get a farm going. Beware, food doesn't last forever!
A good base location tends to be at the intersection between multiple different biomes, with plenty of resources. Your temperature and Yum Bonus will influence the rate at which you give birth. If you are at an ideal temperature and have a high yum chain, you are more likely to have a baby. Choosing a good location will also make your babies more likely to stay, and will improve the overall likelihood that your bloodline will survive many generations. Naming yourself is another step you can take to increase your chances. Don't take it personally if your babies run away or die in your arms (often they may just be trying to return to a past life). Focus on learning and practicing what you can in each life. If you mess up, you can always start afresh in the next life.
For more detailed information on 'Eve-ing' see the Eve page.
General rules for beginners
1. Clutter is death.
Although you will need to stockpile various resources throughout your play, be mindful of clutter, especially around Gooseberry farms and Smithing areas. If there are no empty tiles, you will either be unable to drop whatever you are holding, or you will just switch items with the one on the ground. Many a character has starved because they could not free their hands to pick a berry. In addition, you will soon learn that you cannot click on items behind other characters. With this in mind, avoid standing in front of items that another player is working on, such as the forge.
2. Aim for balanced temperature - Wastes less food.
The rate at which you starve is influenced by your character's temperature. If your meter is in the center, you will waste less food than if it is at extreme heat or extreme cold. When you are a baby, you can improve your chances by finding an optimal temperature tile. And if you contract Yellow Fever (which dangerously raises your temperature), you should avoid warm tiles and ideally find a snow biome tile to counteract the effects.
3. Eat small foods when young.
There are various food items in OHOL, each of which replenish different amounts. When you are young, and have only a few food bars, you should only eat foods with small values, such as Popcorn (3 bars) and Gooseberries (5 bars). This ensures that you do not waste food by overeating. Later, when you have more bars, you can move on to bigger foods such as Pies (7 - 20 bars per bite depending on the variety). Eating a variety of foods as an adult will also increase your Yum Bonus.
4. Soil and water on languishing berry bushes.
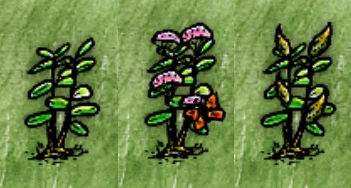
One of the first things you will learn is farming gooseberries, which is vital to the survival of a town. This task is usually assigned to children so that they can work while staying close to food. Here's the basics: Bushes that need attention will be a brown colour. Mouse-over a bush to read its state. Languishing bushes need a bowl of soil, and dry bushes need a bowl of water. Bigger clumps of dirt can be picked up with a basket, and you may need to get water out of a Deep Well or Cistern with a bucket. If you are having trouble, watch or ask other players.
5. Tools break - Don't overuse them. Till piles of two soil to save iron.
Certain tools have a limited number of uses until they break. Using steel tools efficiently is especially important since the iron nerf. Shovels are vital for the Compost cycle and generally should not be used for digging graves (see Bones page for full explanation). A Hoe can be used more efficiently by only tilling piles of two dirt (see Hoe page for full explanation).
6. Name your babies, and don't overfeed them
Remember to name your babies; It is important to be able to identify other characters, to keep track of griefers and to curse them (See the Names page for a full explanation). If you set up your named baby at an ideal temperature, you won't have to feed them as often. Picking up a baby costs you one food bar, so if you pick them up too often, you will waste food. To avoid this, get the baby to say "F" when they are at two bars, and wait until then to pick them up. Alternatively, you can just keep holding the baby at no extra cost to yourself.
7. Hunt and snare animals only when they are in families

Rabbit holes snared without babies will take an hour longer to regenerate. Additionally, killing Mouflon, Boars and Bison in their family form will allow domestication of the baby. In general therefore, it is better to kill wild animals in their family form.
8. Harvest milkweed when fruiting for seeds
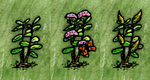
Milkweed stages
Harvest milkweed when it is fruiting (fruiting milkweed will have yellow pods, not purple flowers) in order to collect seeds from the debris. Fruiting debris lasts for 10 minutes while young and flowering debris only last for 1 minute but give no seeds. (Note: Milkweed no longer regenerate from fruiting debris).
9. Use clay wisely
Unlike most resources, clay is non-renewable. You can only collect them from clay pits and one extra by digging up a clay pit with a shovel. Once you have used up all the clay in the area, you will need to travel further and further in order to collect more.
10. Straight Branches
Straight branches are vital for a town's survival, especially in the beginning of a family in Eve camps. You must try to preserve the straight branches and not use them in cases where there are other alternatives, such as kindling. Even if you walk past a straight branch on a tree, it is always a good thing to pick it and set it down, resetting the respawn timer and hopefully leaving the next person who discovers that tree with an extra straight branch.
11. Canada Goose Pond
Geese lay eggs, give feathers for arrows, and can be killed for meat when present at the pond. But geese will permanently be removed from ponds if the goose is shot, or the pond is completely emptied or overfilled. It shouldn't discourage you from emptying ponds for wells but it is always a good strategy to keep at least one goose pond intact.
12. Gooseberries
A wild gooseberry bush regenerates 1 berry every 10 minutes. It is common practice to leave the last berry on a wild bush as a courtesy for the next player who may be in desperate need of food. However, the opposite is true for domestic berries which take 8 minutes to respawn all at once- and only after adding soil and water to an empty bush, in which case it is better to take the last berry in order to replace the berries sooner.
13. Pay attention to carrot crops

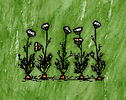
Seeding carrots
After you water carrots, it will take 4 minutes to become mature carrots. But if you do not pick them, after 5 minutes the carrots that remain in the soil plot will go to seed and when harvested will give you more carrot seeds instead of carrots. After a further 10 minutes, the seeding carrots will disappear. If you need carrots, then make sure to watch them and pick them before they turn.
Keep in mind rule number one; if you have several carrot seeds already, picking five seeding rows will just result in more clutter. Use your discretion.
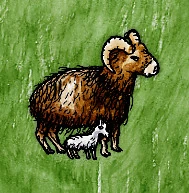
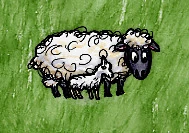
14. Leave one woolly sheep
When tending your sheep pen, it is important to leave at least one sheep, or Domestic Mouflon, or fed lamb alive, in order to produce lambs. Shorn sheep will not produce lambs and must be fed to re-grow their wool. So it is better to designate shorn sheep to be killed for mutton, and produce more wool by feeding lambs instead, which will also produce Sheep Dung. Note: Sheep dung is ONLY produced by feeding a lamb.

Domestic Mouflon with Lamb
Domestic Sheep with Lamb
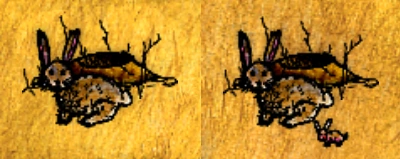
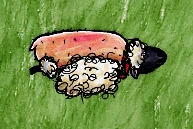
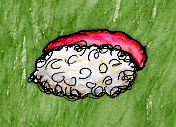
15. Shave sheep before skinning
When you kill a woolly sheep, it will keep its wool. You can still shave the dead sheep with shears to get fleece that can be used to make thread. Skinning it with a knife will give you a sheep skin which has comparatively limited uses.
Shorn dead sheep with wool
Skinned sheep with hide
Resource Respawns
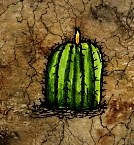
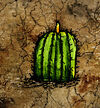
Fruiting Barrel Cactus
- Water, wildlife, the harvesting of wild berry bushes, cactus fruits, and tree branches does not require the same special consideration, as these resources will always eventually respawn, although may be finite in the short-term (objects can take between 15 to 60 minutes, to regenerate).
- As of update 75, wild carrots do not respawn their seeds so after seed removal it is safe to uproot them for eating. Burdock and wild onions are early food sources that cannot be cultivated, provide no seeds, and do not respawn.
- Fertile Soil Pits are also finite. However, it is possible to craft soil via compost later in the game.
Next stage
Now that you've mastered the basics, here are some topics to consider pursuing:
- Fire • Farming • Animals • Compost • Cooking • Baking • Clothes • Smithing • Tools • Medical Treatment • Building
For a more detailed guide on how to survive and thrive in an early settlements, see the Eve page.